Multi-Output
Multi-Output sends one stage to several monitors at once, and each monitor shows only the layers you choose for it. The audience screen gets everything; a stage monitor for the singers gets the words without the moving background; a lobby screen gets the background alone.
There is still one stage — one set of seven layers, one show. You send slides out and take them down exactly as before. The monitors differ only in which layers they show.
| Monitor | Layers shown | What it shows |
|---|---|---|
| 01 Audience | B F 1 2 3 4 5 | Everything |
| 02 Stage | F | The words, without the background and the overlays |
| 03 Lobby | B | The moving background only |
The basics — the stage tile, choosing a screen, the power switch — are in Screens and going live. The layers themselves are in Layers.
Adding monitors
Section titled “Adding monitors”The monitors are listed in Settings › Stage › Output monitors (Settings is the gear at the right end of the status bar). Output 1 is always there.
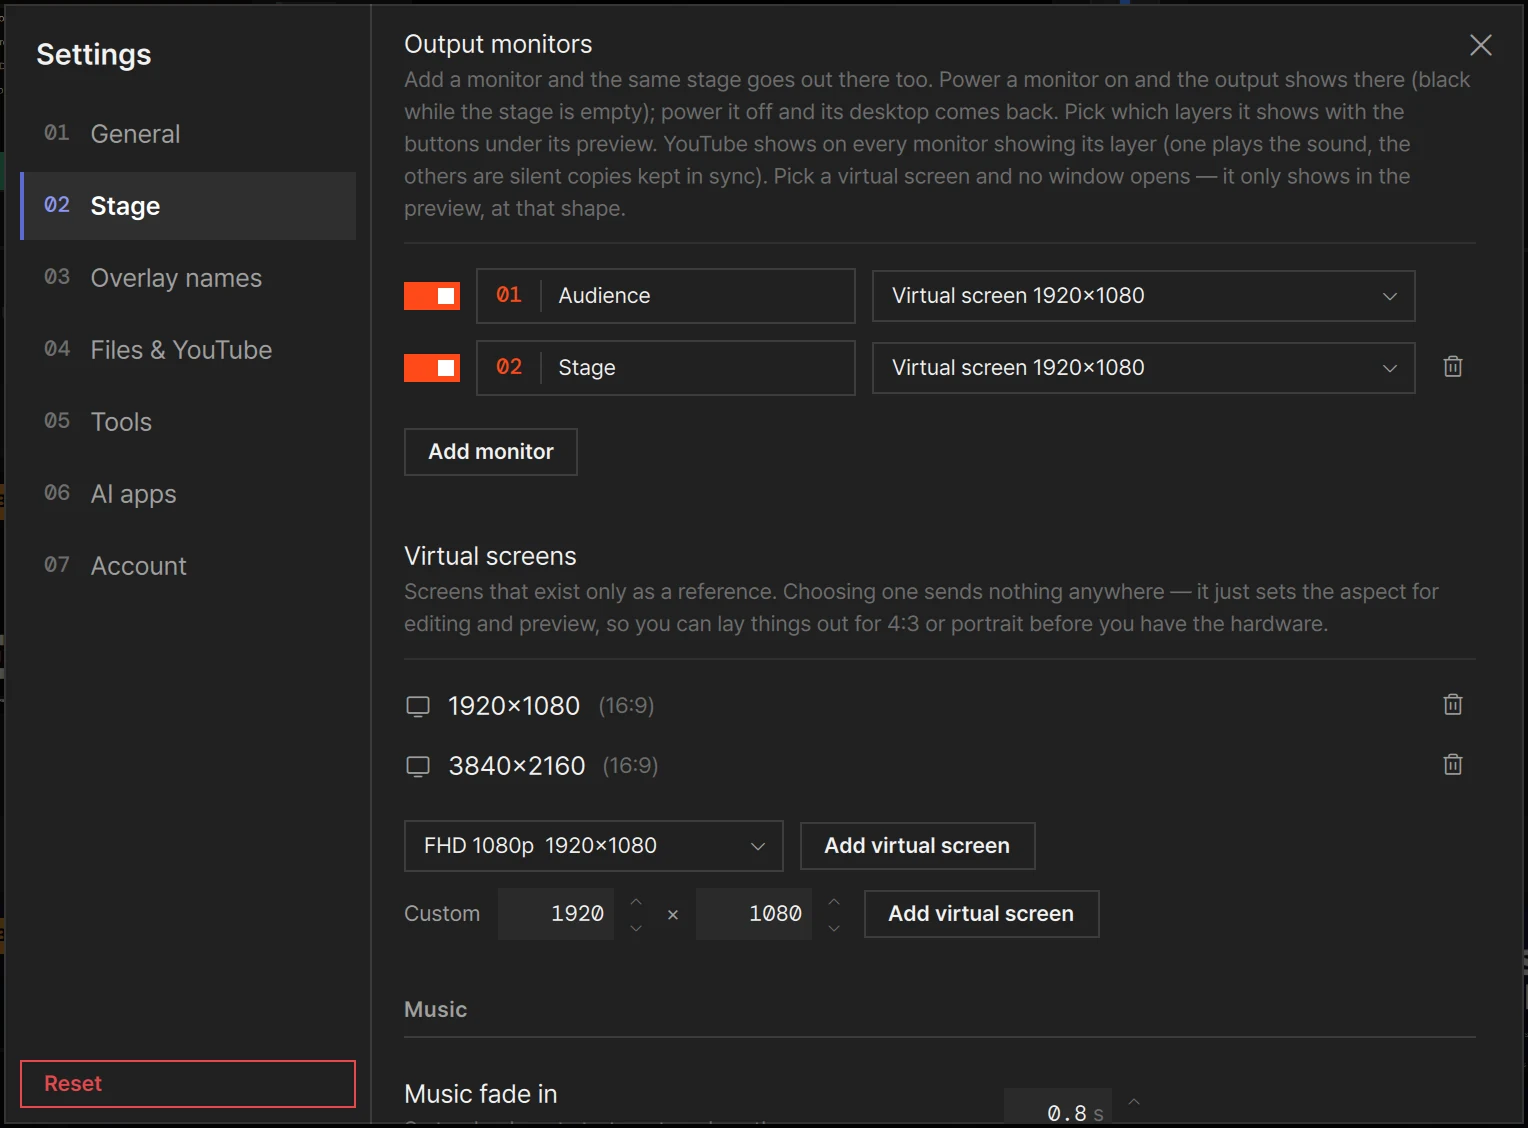
Each row has:
| The switch | The monitor’s power — its output window, on or off (tooltip Power) |
| The number and the name | Type a name such as Audience, Stage or Lobby, up to 24 characters. Left empty, the monitor is called Output 2, Output 3 and so on |
| The screen | The list of screens — the same list as in the panel of each monitor’s tab, Output 1 included (see Choosing the screen). While the chosen screen is unplugged, its name here ends in · not connected |
| The trash button | Removes the monitor (Output 2 on). It is dimmed while that monitor’s output is up: On air — turn its power off first |
Press Add monitor to add one. It starts on a plugged-in external screen that no other monitor uses — or on Pick a screen when there is none — and with its power on, so if its screen is plugged in, the output appears there at once (black while the stage is empty). Give each monitor a screen of its own. When you remove a monitor, the ones after it move up a number.
The names appear on the tabs, in the status bar and in messages. Everything set here — screens, names, power, and the layers each monitor shows — is kept on this computer. It is not saved in cue sheets or presentations, and it does not travel with your account to another computer, whose monitors are different.
Virtual screens
Section titled “Virtual screens”From Output 2 on, a monitor’s screen can be a virtual screen. Then no window opens anywhere: the monitor shows only in its tile, at that shape — as the panel puts it, A virtual screen opens no output window — it only shows in the preview, at its shape. Use it to see what a portrait screen or a 4:3 projector would get before you have one. The sizes on offer are the ones under Settings › Stage › Virtual screens — see Virtual screens.
(For Output 1, a virtual screen sets the shape you edit in.)
The monitor tiles
Section titled “The monitor tiles”The top band shows up to two monitors at a time: the stage tile (Output 1) at the left and, once there are two or more monitors, a second tile to its right.
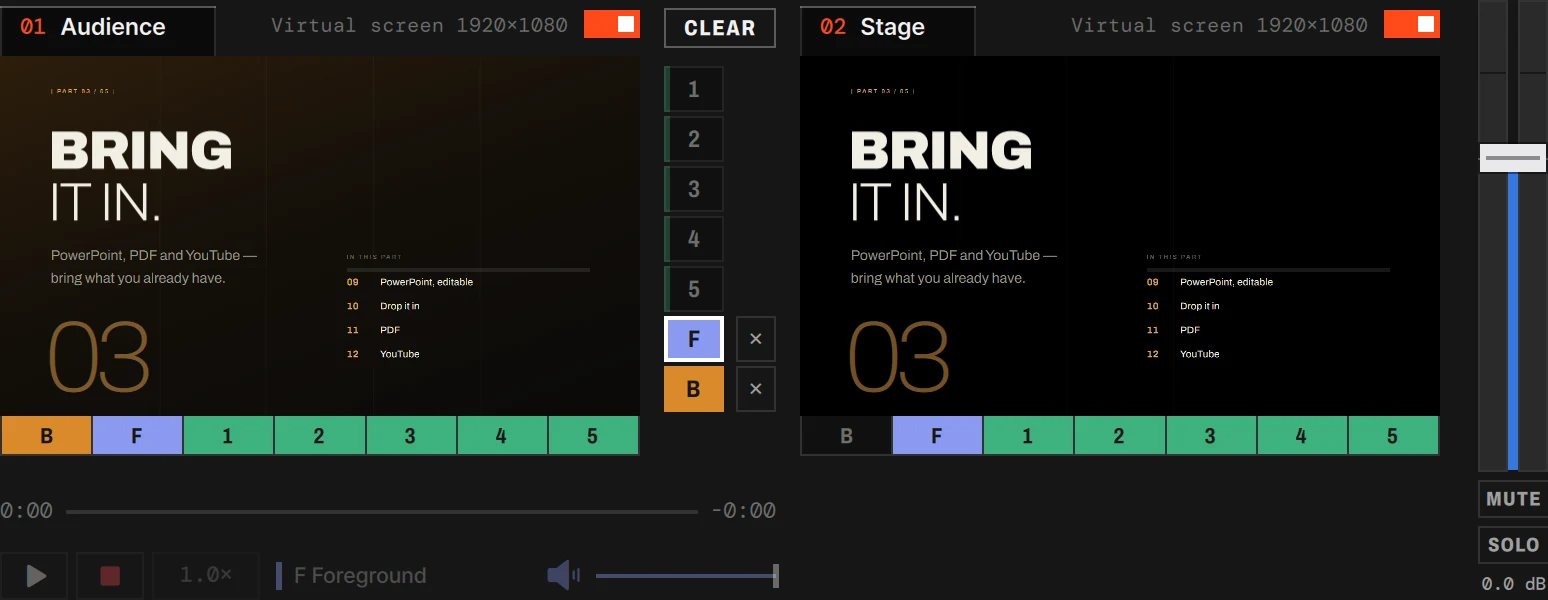
Each tile has the same three parts:
- The header — a tab with the number and the name (01 Audience), the screen’s name and resolution at the right, and the power switch at the right end.
- The preview — what that monitor shows, in the shape of its screen.
- The Layers shown strip — seven cells under the preview, B F 1 2 3 4 5.
Only the stage tile has the layer column and the control row. They belong to the stage, which every monitor shares.
| In the header | What it means |
|---|---|
| An orange number | The power is on and the screen is there, so the output is up. A virtual screen counts here |
| A dim number | The power is off, or the screen is unplugged |
| not connected in orange, at the right | The power is on, but the screen is unplugged |
| Pick a screen at the right | No screen is chosen for this monitor yet — click the tab and pick one |
| The switch, orange | Power on. Its tooltip reads Stop Output; while it is off, Output |
Click the current tab to name the monitor and choose its screen — the same panel as for Output 1. A ▾ shows on the tab while the pointer is over it.
With three or more monitors, the second tile’s header becomes a row of tabs, 02 03 …. The tab of the monitor on show carries its name; the others show their numbers only, with the name in the tooltip. Click a number to show that monitor in the tile.
A tile shows its monitor’s picture even while the power is off, so you can see what will go out before you turn it on. With nothing on stage, a monitor that is on is black, and one that is off shows a monitor icon.
The power switch is the monitor’s output window: on, it opens on that screen; off, it closes and the screen shows its desktop again. Each monitor has its own, and LayerCue remembers it. More in Turning a monitor on and off.
The second tile makes the top band wider. When the window is too narrow for everything, Slide settings and then Music fold into a summary column at the right end of the band — see The main window.
Layers shown
Section titled “Layers shown”The seven cells under each preview choose which layers that monitor shows: B the background, F the foreground, 1–5 the overlays. Click a cell to turn it on or off. A lit cell is filled with its layer’s colour — amber, indigo, green — and an unlit one is dark. Point at a cell and it fills from the bottom with what a click will do; its tooltip gives the layer’s name.
- It acts at once, during the show too, and only on that monitor. The layer stays up on stage and on the other monitors, and its cell in the layer column stays lit.
- The stage tile follows Output 1’s cells. Turn a layer off there and it disappears from the stage preview too, though it is still up.
- With all seven off, the monitor’s window stays open and shows black.
- Overlays go one by one, so a logo on overlay 1 can go to the audience screen but not to the stage monitor. A name you gave an overlay in Settings › Overlay names shows in its cell’s tooltip.
What the B cell takes away
Section titled “What the B cell takes away”With B off, a monitor shows nothing of the background layer: neither a looping background video nor the background of a slide set to Background. Such a slide is split when it goes out — its background goes to the background layer, and the text and everything else on top goes to the foreground (Layers). So a stage monitor with B off shows the words on black.
A slide set to Foreground, or to an overlay, goes out whole, background and all, and B does not touch it. If a stage monitor still shows a slide’s colour or picture, that slide is set to Foreground — switch it to Background with the chip on its card. (A slide whose layer you never set becomes a Background slide by itself as soon as you put something in its background row in the slide editor — unless it is a YouTube or web slide.)
The on-air list in the status bar
Section titled “The on-air list in the status bar”Near the left end of the status bar, beside a monitor icon, a chip sums up the monitors — On air 1/2 · Audience · Stage: how many of the monitors you have turned on are showing their output now, and their names. A monitor on a virtual screen counts while its power is on, just as its tab’s number is orange then — even though it opens no window. It reads No output while none is.
| The chip’s dot | Means |
|---|---|
| Orange | Every monitor you turned on is showing its output |
| An orange ring | Only some are — usually a screen is unplugged |
| Grey | None is |
Click the chip for the list of monitors. Each row has a dot, the number and the name, the screen, and the power switch.
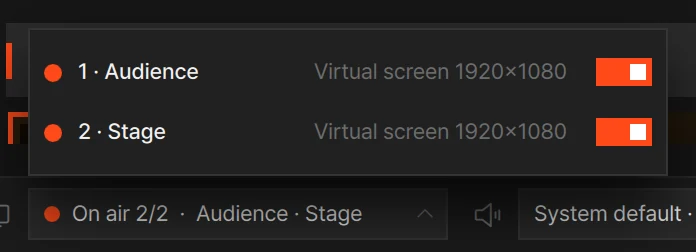
| A row’s dot | Means |
|---|---|
| Grey | Power off |
| Orange | Power on |
| An orange ring | Power on, but the screen is not there |
YouTube on several monitors
Section titled “YouTube on several monitors”A streaming YouTube goes to every monitor that shows its layer. One of them plays it with the sound; the others get silent copies that follow its position, so they stay in step. The captions, Scale and quality you choose apply to the copies too. (A downloaded YouTube plays like any video file — every monitor shows the same picture, with no copies needed.)
- The sound starts on the lowest-numbered monitor that shows the layer, and stays with that monitor. A monitor you turn on later joins as a copy and jumps to where the video has got to. A copy appears on its screen only once it has caught up.
- Turn the layer off on the monitor with the sound and the video disappears from that screen, but its sound carries on; turn the cell back on and the video is there again at once. Turn that monitor off and the video keeps playing hidden inside LayerCue, sound and all, while the other monitors carry on with their copies; turn it back on and the video returns to it.
- Each copy streams the video on its own. Every extra monitor adds to the internet use, and each one buffers on its own.
While the video plays on an output screen, the tiles cannot show it. The tile of the monitor with the sound shows a cover instead — YouTube is playing on the output screen, with the quality and, when the video has them, the chapters. If the YouTube sits in a video box, every tile whose monitor gets it draws a red outline where the box is.
Bring to preview, on the cover, brings the video into that tile so you can watch it there. It comes off the output screens meanwhile — the copies hide too — while the sound carries on. Send back to output, at the top left of the tile, puts it back. Taking the YouTube down puts an end to this too.
When no output window shows the YouTube’s layer — in a rehearsal with every monitor off, say — the video plays right in the tile of a monitor that shows its layer.
When a screen is unplugged
Section titled “When a screen is unplugged”If a monitor’s screen goes away during the show, LayerCue closes that monitor’s window and names it: “Stage” screen disconnected — plug it back in and it comes right back. (With no other monitor out, the message reads Output screen disconnected — plug it back in and it comes right back.) The other monitors carry on.
The power stays on. The tab’s number goes dim, the header reads not connected, and the status bar chip shows an orange ring. Plug the screen back in and the output returns by itself. LayerCue never moves an output onto another screen — least of all onto the one you work on.
Things to know
Section titled “Things to know”- One stage. Every monitor shows the same slides; they differ only in which layers they show. You cannot send different slides to different monitors, or a single text box to one monitor only.
- Each monitor has its own shape. The picture fills each screen, with no black bars, and Fill and Fit are worked out for each screen. Text boxes are placed as a share of the screen’s width and height, so on a portrait or 4:3 monitor they stretch or narrow with it. The cards and the slide editor always use Output 1’s shape — check the other monitors in their tiles before the show.
- One sound. All sound goes to the one audio device chosen in the status bar; the monitors have no sound of their own. See Sound and the meter.
- Each output window adds drawing work. A video is decoded once however many monitors show it, but every window draws it again. With several large screens on a modest computer, run the show once on the real equipment.
- On a Mac, every monitor whose power is on is set to 1:1 resolution — see Output resolution on a Mac.